Patient with References tutorial
This tutorial will build on the foundation laid out in the Simple Patient tutorial to introduce resource linking in FHIR by the way of references.
Урок "Пациент со ссылками"
Этот урок будет основываться на фундаменте, заложенном в уроке Пациент, чтобы представить связывание ресурсов в FHIR посредством ссылок.
Step 1: Setup
Prior to doing the tutorial, a set of FHIR resources needs to be uploaded to the tutorial FHIR server so you can query them. Press the Upload button below to send your resources up:
Шаг 1: Настройка
Перед выполнением урока необходимо загрузить набор ресурсов FHIR на учебный сервер FHIR, чтобы вы могли их запрашивать. Нажмите кнопку Загрузить ниже, чтобы отправить ваши ресурсы:
Step 2: Find your patient
The patient you'll be working with is:
Шаг 2: Найдите своего пациента
Пациент, с которым вы будете работать:
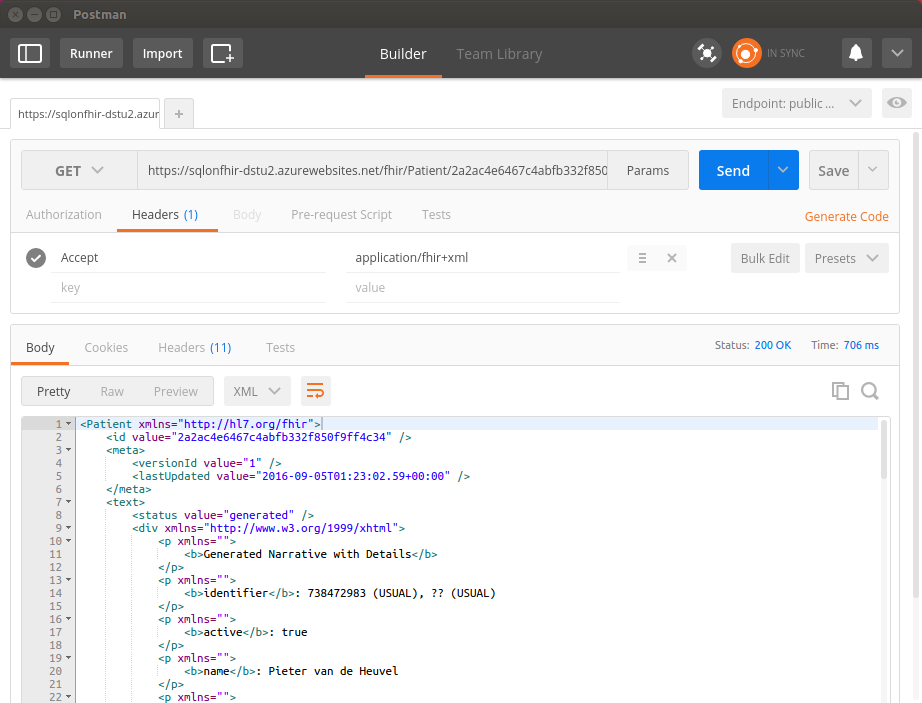
Open Postman and retrieve the resource, if you have forgotten how then revisit the Simple Patient tutorial. You should see this in Postman when successful.
Our sample patient today is Pieter van de Heuvel, who came into the hospital for his scheduled heart valve replacement, but fainted before the procedure could begin - for this reason, the medical staff decided to do some blood tests on the patient first.
There are 6 resources we'll be working with in this use case - Patient, Encounter, ServiceRequest, DiagnosticReport, and two Observations.
Откройте Postman и получите ресурс, если вы забыли как это сделать, то вернитесь к уроку Пациент. При успешном выполнении вы должны увидеть это в Postman.
Наш образец пациента сегодня - Питер ван де Хёвел, который пришел в больницу для запланированной замены сердечного клапана, но потерял сознание до того, как процедура могла начаться - по этой причине медицинский персонал решил сначала сделать анализы крови пациенту.
В этом случае использования мы будем работать с 6 ресурсами - Patient, Encounter, ServiceRequest, DiagnosticReport, и двумя Observation.
Step 3: Observe external references
In FHIR resources are referenced, or linked, in one direction only. For example, if you have two resources - a Patient and an Observation - a Patient will not be linked to any of the Observations; instead all Observations will be linked to the Patient. This is an optimisation measure - it means that as you add more Observations, you do not have to keep updating your Patient resource with the new references. This also means that the Patient doesn't have an explicit link to any of the Observations - but not to worry, there is a way to see all Observations that a Patient has, which we'll cover later.
In order to see which resource links to which, open up the FHIR specification for a specific resource and observe the list of resources that reference it. In our example, you can find out if it is a Patient linking to an Observation or an Observation linking to a Patient by opening both the Patient and Observation FHIR specification pages. You'll notice that Patient mentions that it's referenced by the Observation resource and Observation does not, instead it has a subject field which references Patient.
In the same Postman window, press Ctrl/⌘+F and copy/paste reference - you'll find that the Patient does not contain any references. Even though our patient had an encounter (when he came into the hospital for his procedure), it is not listed here.
Instead, it is the Encounter that has a reference to the Patient. That way more Encounters can be added without having to update the Patient resource every time (which can become very time-consuming in a large system). In the next section, you'll see how you can find the Encounter that's associated with your Patient.
Шаг 3: Посмотрите на внешние ссылки
В FHIR ресурсы ссылаются или связываются только в одном направлении. Например, если у вас есть два ресурса - Patient и Observation - Patient не будет связан ни с одним из Observation; вместо этого все Observation будут связаны с Patient. Это мера оптимизации - это означает, что при добавлении новых Observation вам не нужно постоянно обновлять ресурс Patient новыми ссылками. Это также означает, что Patient не имеет явной ссылки на какие-либо Observation - но не беспокойтесь, есть способ увидеть все Observation, которые есть у Patient, что мы рассмотрим позже.
Чтобы увидеть, какой ресурс ссылается на какой, откройте спецификацию FHIR для конкретного ресурса и посмотрите на список ресурсов, которые на него ссылаются. В нашем примере вы можете выяснить, ссылается ли Patient на Observation или Observation ссылается на Patient, открыв страницы спецификации FHIR как для Patient, так и для Observation. Вы заметите, что Patient упоминает, что на него ссылается ресурс Observation, а Observation не упоминает, вместо этого у него есть поле subject, которое ссылается на Patient.
В том же окне Postman нажмите Ctrl/⌘+F и скопируйте/вставьте reference - вы обнаружите, что Patient не содержит ссылок. Хотя у нашего пациента была встреча (когда он пришел в больницу для своей процедуры), она здесь не указана.
Вместо этого именно Encounter имеет ссылку на Patient. Таким образом, можно добавлять больше Encounter без необходимости каждый раз обновлять ресурс Patient (что может стать очень трудоемким в большой системе). В следующем разделе вы увидите, как можно найти Encounter, связанный с вашим Patient.
Step 4: Search for a resource using a reference
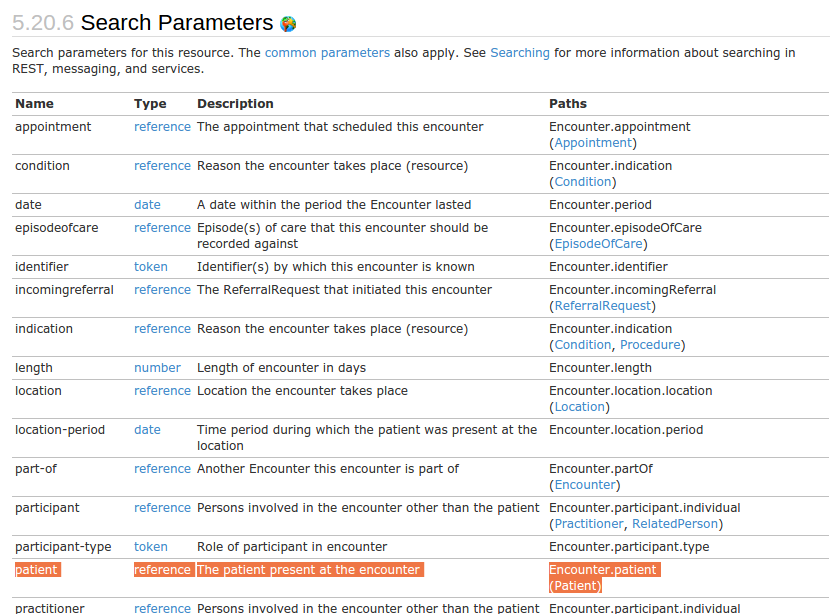
FHIR has a notion of Search Parameters, which allow you to locate resources given certain information you know about them. As a sample use case, let's find the Encounter that's associated with our patient. Scrolling down to the Search Parameters section of Encounter, we see that there's one named patient which allows us to search for the patient present in the encounter.
Thus, given the patient's server ID of (press Upload first) (this can be seen at the end of the URL and in the <id> field), in order to find which encounters our patient has, the query follows this format:
(press Upload first)/Encounter?patient=Patient/<patient id>
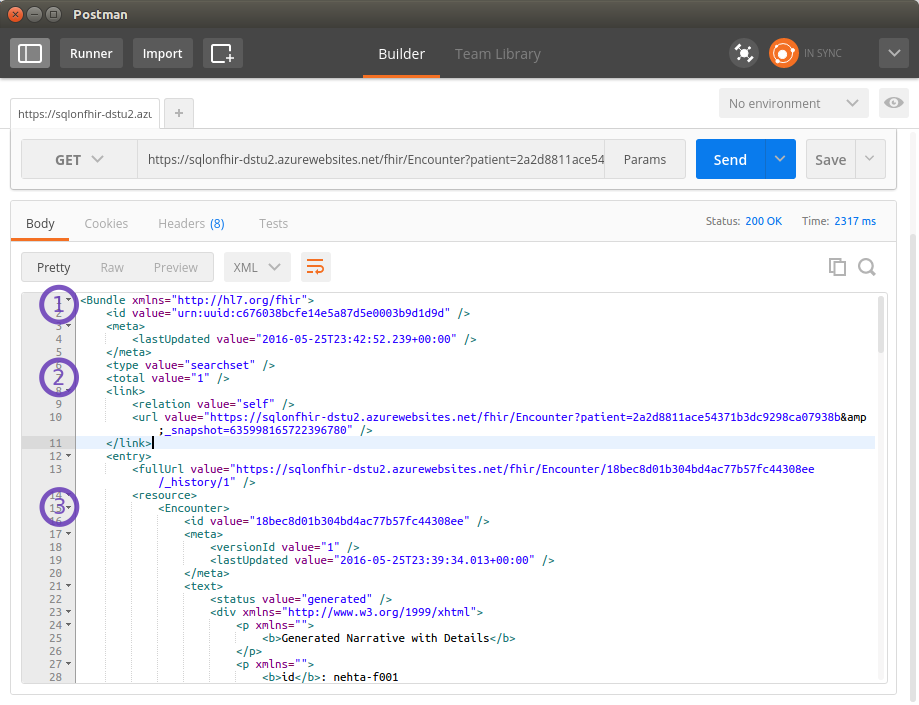
It essentially says - "give me all Encounters that have this patient ID as the subject patient". Try entering (press Upload first)/Encounter?patient=Patient/ into Postman - you'll see a result like this:
 .
.
Three things are of interest are:
- We get a Bundle resource back. A Bundle is essentially a container for resources, used in many places including search results.
- Our Bundle has 1 result in it, which is...
- The expected Encounter resource, given our Patient has just one recorded encounter.
We've now successfully located which encounters our patient has using a reference - congratulations!
Шаг 4: Поиск ресурса с использованием ссылки
В FHIR есть понятие параметров поиска, которые позволяют находить ресурсы, используя определенную известную вам о них информацию. В качестве примера использования давайте найдем Encounter, связанный с нашим пациентом. Прокрутив вниз к разделу Параметры поиска Encounter, мы видим, что есть один с именем patient, который позволяет нам искать пациента, присутствующего во встрече.
Таким образом, учитывая серверный ID пациента (сначала нажмите Загрузить) (это можно увидеть в конце URL и в поле <id>), чтобы найти, какие встречи есть у нашего пациента, запрос следует этому формату:
(сначала нажмите Загрузить)/Encounter?patient=Patient/<patient id>
По сути это говорит - "дайте мне все Encounter, которые имеют этот ID пациента в качестве субъекта пациента". Попробуйте ввести (сначала нажмите Загрузить)/Encounter?patient=Patient/ в Postman - вы увидите результат, подобный этому:
.
Три вещи представляют интерес:
- Мы получаем ресурс Bundle обратно. Bundle - это по сути контейнер для ресурсов, используемый во многих местах, включая результаты поиска.
- Наш Bundle содержит 1 результат, который является...
- Ожидаемым ресурсом Encounter, учитывая, что у нашего Patient есть только одна записанная встреча.
Теперь мы успешно определили, какие встречи есть у нашего пациента, используя ссылку - поздравляем!
Step 5: Observe contained resource references
References don't always have to point to a resource located elsewhere, they can also point to resources that are contained (embedded) in the resource. Load up our ServiceRequest in Postman:
(press Upload first)
Press Ctrl/⌘+F and copy/paste practitionerid - you'll find two references to it, one in "reference": "#practitionerid" and another in a "contained" field:
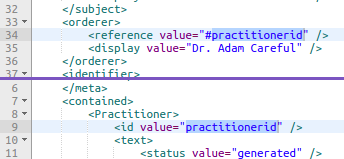
Whenever you see an identifier start with the hash sign (#), you will see a corresponding resource within the "contained" field, embedded in the parent resource. Such embedding should only be done in the cases where the embedded resource can't exist on its own - for example it can't have an identifier to uniquely identify it or it only makes sense in a particular transaction scope.
Шаг 5: Наблюдайте ссылки на содержащиеся ресурсы
Ссылки не всегда должны указывать на ресурс, расположенный в другом месте, они также могут указывать на ресурсы, которые содержатся (встроены) в ресурсе. Загрузите наш ServiceRequest в Postman:
(сначала нажмите Загрузить)
Нажмите Ctrl/⌘+F и скопируйте/вставьте practitionerid - вы найдете две ссылки на него, одну в <reference value="#practitionerid" /> и другую в поле <contained>:
Всякий раз, когда вы видите идентификатор, начинающийся со знака решетки (#), вы увидите соответствующий ресурс в поле <contained>, встроенный в родительский ресурс. Такое встраивание должно выполняться только в случаях, когда встроенный ресурс не может существовать самостоятельно - например, он не может иметь идентификатор для уникальной идентификации или имеет смысл только в определенной области транзакции.