Patient resource
This tutorial is designed for FHIR beginners wishing to become familiarised with the basics of FHIR. In this tutorial, we will walk through the basic CRUD operations. CRUD stands for Create, Read, Update & Delete. These are the four main actions that you will use to interact with the FHIR resources within a FHIR server. Understanding these four operations is essential to working with any RESTful service which a FHIR server is an implementation of. REST stands for 'Representational state transfer' and RESTFul just means a system that conforms to the constraints of REST. You don't need to know any more about REST at this stage for the tutorial but if you want more on REST take a look at this page, Representational state transfer (REST).
Ресурс пациента
Этот урок предназначен для начинающих изучать FHIR, желающих ознакомиться с основами FHIR. В этом уроке мы рассмотрим основные операции CRUD. CRUD означает Create (Создать), Read (Прочитать), Update (Обновить) и Delete (Удалить). Это четыре основных действия, которые вы будете использовать для взаимодействия с ресурсами FHIR на сервере FHIR. Понимание этих четырех операций необходимо для работы с любым RESTful сервисом, реализацией которого является сервер FHIR. REST означает 'Representational state transfer' (передача состояния представления), а RESTful просто означает систему, которая соответствует ограничениям REST. На данном этапе урока вам не нужно знать больше о REST, но если вы хотите узнать больше о REST, посмотрите эту страницу: Representational state transfer (REST).
Step 1: Setup a Http post client Шаг 1: Настройка HTTP-клиента
The simplest way to retrieve and send FHIR resources to and from a FHIR server is to use a Http post client. This tutorial will use Postman. Postman can be installed as a Chrome browser extension or as a Mac App. You could use any of a number of post clients but the tutorial will assume you are using Postman.
What is a post client? It is a tool that allows you to talk to servers using Hypertext Transfer Protocol (HTTP), the protocol the internet works on. When you use an internet browser the browser is converting your clicks and text into HTTP to send to the web server and the server returns content, your web page, back via HTTP. The browser then interprets the content as a web page and displays it on screen. When we work with FHIR the content is not a web page but rather JSON or XML. Our web browser is not very good at displaying raw JSON or XML so we need a HTTP client so that we can talk in HTTP and view the JSON or XML returned.
Head over to POSTMAN via the link and install Postman now if you have not already done so. You don't need an account to get Postman just download the application.
Once you are done you will have a Postman client that looks like this:
There are other Http post clients that could be used like Insomnia so don't feel you have to use Postman.
Самый простой способ получать и отправлять ресурсы FHIR на сервер FHIR и с него - использовать HTTP-клиент. В этом уроке будет использоваться Postman. Postman можно установить как расширение браузера Chrome или как приложение для Mac. Вы можете использовать любой из множества HTTP-клиентов, но урок предполагает, что вы используете Postman.
Что такое HTTP-клиент? Это инструмент, который позволяет вам общаться с серверами, используя протокол передачи гипертекста (HTTP) - протокол, на котором работает интернет. Когда вы используете интернет-браузер, браузер преобразует ваши клики и текст в HTTP для отправки на веб-сервер, а сервер возвращает содержимое, вашу веб-страницу, обратно через HTTP. Затем браузер интерпретирует содержимое как веб-страницу и отображает её на экране. Когда мы работаем с FHIR, содержимое - это не веб-страница, а XML или JSON. Наш веб-браузер не очень хорошо отображает сырой XML или JSON, поэтому нам нужен HTTP-клиент, чтобы мы могли общаться по HTTP и просматривать возвращаемые XML или JSON.
Перейдите по ссылке на POSTMAN и установите Postman сейчас, если вы ещё этого не сделали. Вам не нужна учётная запись для получения Postman, просто скачайте приложение.
После завершения у вас будет клиент Postman, который выглядит так:
Есть другие HTTP-клиенты, которые можно использовать, например Insomnia, так что не чувствуйте себя обязанными использовать Postman.
Step 2: Getting your first resource from a FHIR server Шаг 2: Получение первого ресурса с сервера FHIR
So the first thing we are going to cover is how you go about getting a FHIR resource from a FHIR server. Of course, before you can get a resource someone had to create one on the server. Luckily for you, this web page can do that for you. The button below will upload a FHIR Patient resource to a FHIR server for you and the tutorial will continue to explain how to retrieve that resource using the post client.
So before we move on click the button below to upload a FHIR Patient resource to the FHIR server. This action will give you a resource to play with independent of the other participants. To do this, all you need to do is hit the button below. Click the button now.
Итак, первое, что мы рассмотрим, - это как получить ресурс FHIR с сервера FHIR. Конечно, прежде чем вы сможете получить ресурс, кто-то должен был создать его на сервере. К счастью для вас, эта веб-страница может сделать это за вас. Кнопка ниже загрузит ресурс FHIR Patient на сервер FHIR для вас, и урок продолжит объяснять, как получить этот ресурс с помощью HTTP-клиента.
Итак, прежде чем мы продолжим, нажмите кнопку ниже, чтобы загрузить ресурс FHIR Patient на сервер FHIR. Это действие даст вам ресурс для работы независимо от других участников. Для этого всё, что вам нужно сделать, - это нажать кнопку ниже. Нажмите кнопку сейчас.
Your FHIR patient resource is:
Ваш ресурс пациента FHIR:
                                ....Click the button for this to refresh!
                                ....Нажмите кнопку для обновления!
So you have your own FHIR resource in the FHIR server and a post client to send and retrieve resources with. There are many publicly available FHIR servers for testing on the internet and a full list can be found here. For this tutorial we are going to be using the server found at the following address:
[Service Root URL]
The address above is called the 'Service Root URL' and it is from here that all further request to this server will begin. But of course, we need to further tell the server which resource type we are interested in. This is the next part of the URL. For this tutorial, we are dealing with Patient resources so we will extend the 'Service Root URL' by appending the resource type we are looking for. Take note that all resources begin with a capital letter: e.g. Patient.
[Service Root URL]/Patient
We also need to tell the server which particular Patient resource we want. Generally, you would want to use a Patient's Medical Record Number (MRN), name or other identifiers and we will cover that later in searching. For now we are going to use the resource id to locate our patient. We will also cover more about resource ids a bit later. For now, let's just add the following resource id to our URL we are constructing:
[Service Root URL]/Patient/[id]
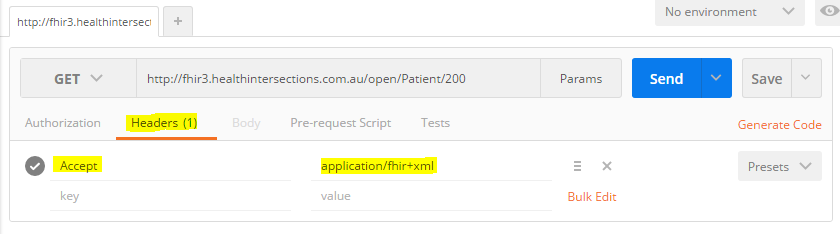
We're almost ready to get our resource from the FHIR server but there is one last part we need to cover. We need to understand a little bit about content negotiation. Don't worry, there is not much to it. FHIR resources can be expressed in either JSON or XML, these are just two different ways that we can format a resource's data. Before we talk to our server we need to agree on which format we are going to talk in. To tell the server what format we want to be returned we pass it the Accept property and it needs to be equal to either application/fhir+json or application/fhir+xml. This is something we need to configure in our Http post client Postman. In Postman go to the Header tab and add the following property: Accept application/fhir+json, as seen in this screenshot.
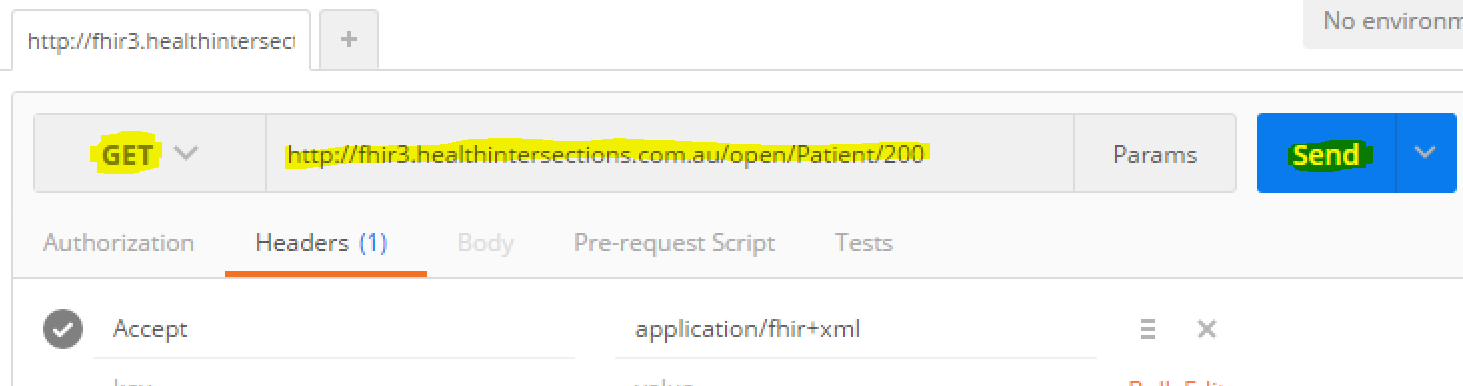
Ok, we're done. All you need to do is paste the full URL we constructed into the Postman's URL box, ensure the call type is set to GET and hit the Send button. See this screenshot if you need help.
You should have received your first FHIR Patient resource back from the server in a JSON format. Well done!
Try changing the Accept property to application/fhir+xml hit Send again. You will receive the same resource content although now in an XML format. Make sure you set it back to application/fhir+json when you're done as the rest of this tutorial will be using the JSON format.
Итак, у вас есть собственный ресурс FHIR на сервере FHIR и HTTP-клиент для отправки и получения ресурсов. В интернете есть много общедоступных серверов FHIR для тестирования, и полный список можно найти здесь. Для этого урока мы будем использовать сервер, расположенный по следующему адресу:
[Service Root URL]
Адрес выше называется 'Service Root URL' (корневой URL сервиса), и именно отсюда будут начинаться все дальнейшие запросы к этому серверу. Но, конечно, нам нужно дополнительно сообщить серверу, какой тип ресурса нас интересует. Это следующая часть URL. Для этого урока мы имеем дело с ресурсами Patient, поэтому мы расширим 'Service Root URL', добавив тип ресурса, который мы ищем. Обратите внимание, что все ресурсы начинаются с заглавной буквы: например, Patient.
[Service Root URL]/Patient
Нам также нужно сообщить серверу, какой именно ресурс Patient мы хотим. Обычно вы хотели бы использовать номер медицинской карты пациента (MRN), имя или другие идентификаторы, и мы рассмотрим это позже при поиске. Сейчас мы будем использовать id ресурса для поиска нашего пациента. Мы также рассмотрим больше о id ресурсов немного позже. Пока давайте просто добавим следующий id ресурса к URL, который мы конструируем:
[Service Root URL]/Patient/[id]
Мы почти готовы получить наш ресурс с сервера FHIR, но есть ещё одна последняя часть, которую нам нужно рассмотреть. Нам нужно немного понять согласование содержимого. Не волнуйтесь, в этом нет ничего сложного. Ресурсы FHIR могут быть выражены в JSON или XML - это просто два разных способа форматирования данных ресурса. Прежде чем мы поговорим с нашим сервером, нам нужно договориться о том, в каком формате мы будем общаться. Чтобы сообщить серверу, какой формат мы хотим получить в ответ, мы передаём ему свойство Accept, которое должно быть равно либо application/fhir+json, либо application/fhir+xml. Это то, что нам нужно настроить в нашем HTTP-клиенте Postman. В Postman перейдите на вкладку Header и добавьте следующее свойство: Accept application/fhir+json, как показано на этом скриншоте.
Хорошо, мы закончили. Всё, что вам нужно сделать, - это вставить полный URL, который мы построили, в поле URL Postman, убедиться, что тип вызова установлен на GET, и нажать кнопку Send. Посмотрите этот скриншот, если вам нужна помощь.
Вы должны были получить свой первый ресурс FHIR Patient обратно с сервера в формате JSON. Отлично!
Попробуйте изменить свойство Accept на application/fhir+xml и снова нажать Send. Вы получите то же содержимое ресурса, хотя теперь в формате XML. Убедитесь, что вы установили его обратно на application/fhir+json, когда закончите, поскольку остальная часть этого урока будет использовать формат JSON.
Step 3: Updating your resource in the FHIR server Шаг 3: Обновление ресурса на сервере FHIR
So now you know how to get a resource from the FHIR server. Next, we are going to update an existing resource on the FHIR server. Let's pretend the patient's name was entered incorrectly and it's your job to fix it up. We are just going to use the same resource you retrieved from Step 2: Getting your first resource from a server.
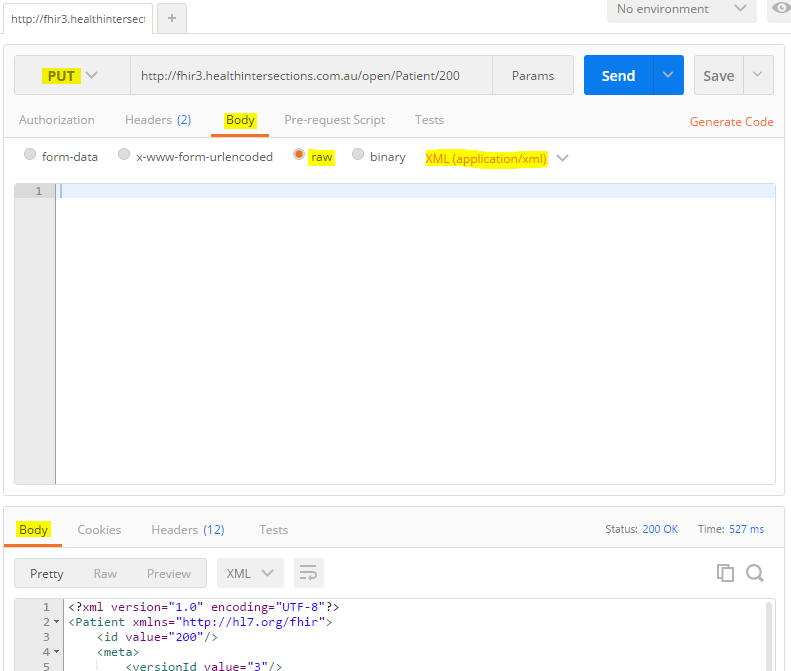
In Postman, you first need to set the call type to PUT, then click the Body tab. Make sure you are clicking the right Body tab as there are two. The Body tab at the bottom is where resources returned by the FHIR server are seen, as in Step 1. The Body tab at the top, just under the URL box, is where we place resources to send to the server. You need to click the Body tab at the top. You will also need to click the radio button labelled raw to allow the Body's text box to be seen. Take a look at this screenshot for help.
Now go ahead and copy the Patient resource we received from the server from the bottom Body section to the top Body section and then in the top section edit the patient's given name and surname to your name. Don't worry, our PAS team is too busy with duplicate patient merging to notice.
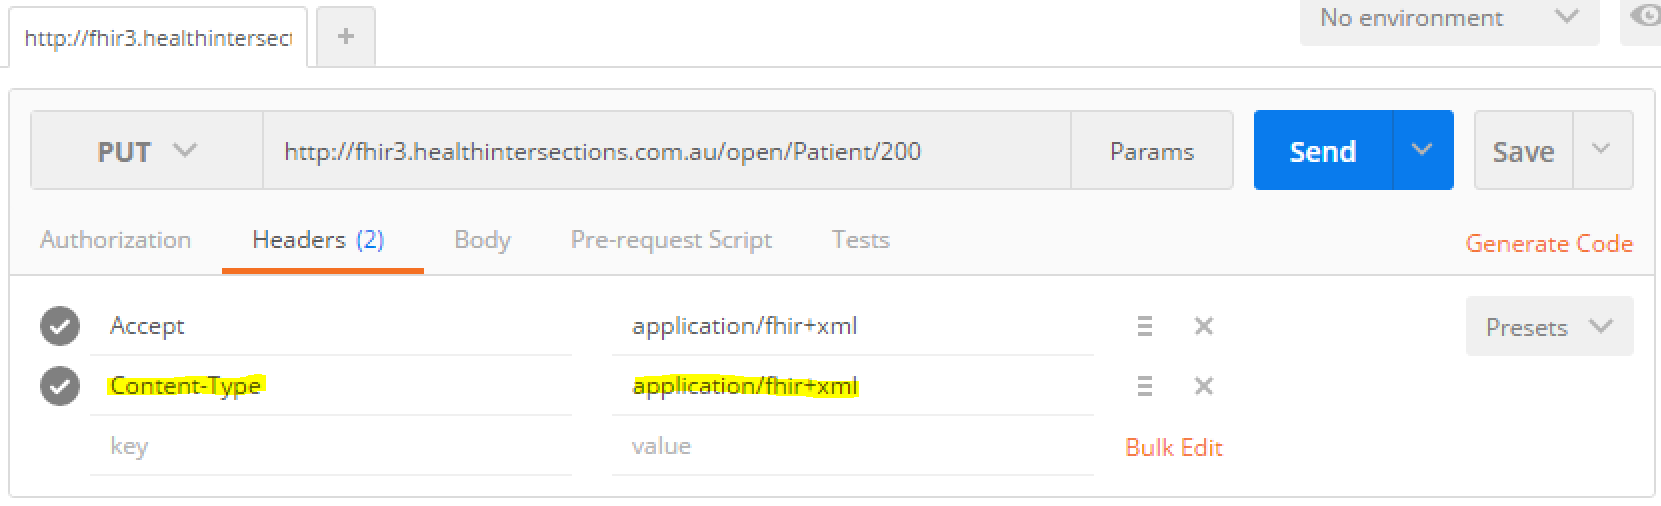
With your edits made, it's time to update. But before we do that, we need to cover the last part of 'content negotiation'. In the GET example, we used the Accept property to tell the server the format (JSON or XML) we wanted to be returned by the server. This time, it is us sending content to the server by way of our Patient resource. In this case, we need to tell the server what format the content we are sending is in. To do this we return to the Header tab and use the Content-Type property, and as before we need to set it as either application/fhir+json or application/fhir+xml. But of course, it needs to match the actual content we are sending. So if your Patient resource is in a JSON format then use application/fhir+json or if it is XML use application/fhir+xml. Here is a screenshot of it being set to JSON.
Notice that the Accept property is still set from the last GET calls we made. This is fine and actually desired, as long as it is still set to the content type you want to be returned. Now that these two properties are set Postman will remember them for our session, so no need to keep setting them; unless you want to change between JSON and XML. From here forward the exercise will just assume you have these two properties set and will not instruct you to set them again. Furthermore, our exercises will all be done in JSON.
Итак, теперь вы знаете, как получить ресурс с сервера FHIR. Далее мы собираемся обновить существующий ресурс на сервере FHIR. Давайте представим, что имя пациента было введено неправильно, и ваша задача - исправить это. Мы просто будем использовать тот же ресурс, который вы получили из Шага 2: Получение первого ресурса с сервера.
В Postman сначала нужно установить тип вызова на PUT, затем нажать вкладку Body. Убедитесь, что вы нажимаете правильную вкладку Body, поскольку их две. Вкладка Body внизу - это место, где видны ресурсы, возвращённые сервером FHIR, как в Шаге 1. Вкладка Body вверху, прямо под полем URL, - это место, где мы размещаем ресурсы для отправки на сервер. Вам нужно нажать вкладку Body вверху. Вам также нужно будет нажать радиокнопку с надписью raw, чтобы увидеть текстовое поле Body. Посмотрите на этот скриншот для помощи.
Теперь скопируйте ресурс Patient, который мы получили с сервера, из нижней секции Body в верхнюю секцию Body, а затем в верхней секции отредактируйте имя и фамилию пациента на ваше имя. Не волнуйтесь, наша команда PAS слишком занята объединением дублирующих пациентов, чтобы это заметить.
После внесения изменений пришло время обновить. Но прежде чем мы это сделаем, нам нужно рассмотреть последнюю часть 'согласования содержимого'. В примере с GET мы использовали свойство Accept, чтобы сообщить серверу формат (JSON или XML), который мы хотели получить от сервера. На этот раз мы отправляем содержимое на сервер посредством нашего ресурса Patient. В этом случае нам нужно сообщить серверу, в каком формате находится содержимое, которое мы отправляем. Для этого мы возвращаемся к вкладке Header и используем свойство Content-Type, и, как и раньше, нам нужно установить его как application/fhir+json или application/fhir+xml. Но, конечно, оно должно соответствовать фактическому содержимому, которое мы отправляем. Итак, если ваш ресурс Patient в формате JSON, то используйте application/fhir+json, или если это XML, используйте application/fhir+xml. Вот скриншот его установки в JSON.
Обратите внимание, что свойство Accept всё ещё установлено с последних вызовов GET, которые мы делали. Это нормально и фактически желательно, пока оно всё ещё установлено на тип содержимого, который вы хотите получить в ответ. Теперь, когда эти два свойства установлены, Postman запомнит их для нашей сессии, поэтому нет необходимости продолжать их устанавливать; если только вы не хотите переключаться между JSON и XML. Отныне упражнение будет просто предполагать, что у вас установлены эти два свойства, и не будет инструктировать вас устанавливать их снова. Кроме того, все наши упражнения будут выполняться в JSON.
Accept: |
application/fhir+json or application/fhir+xml
                                    {format to be returned from the server}
                                    {формат для возврата с сервера}
|
Content-Type: |
application/fhir+json or application/fhir+xml
                                    {format being given to the server}
                                    {формат, передаваемый серверу}
|
So now it's time to hit Send which will update the Patient resource on the FHIR server.
Once you have updated, try doing a GET, as in Step 3, to see if your resource was updated. If you compare the versionId within the resource you will see it increased by one.
Итак, теперь пришло время нажать Send, что обновит ресурс Patient на сервере FHIR.
После обновления попробуйте выполнить GET, как в Шаге 2, чтобы увидеть, был ли обновлён ваш ресурс. Если вы сравните versionId внутри ресурса, вы увидите, что он увеличился на единицу.
Step 4: Adding a new resource to the FHIR server Шаг 4: Добавление нового ресурса на сервер FHIR
You should now know how to get a resource from a FHIR server and how to update that resource. Now we are going to look at adding a new resource to a FHIR server. Perhaps we have a brand new patient to enter into our system. In the previous 'Step 3: Updating your resource in the FHIR server' we used the call type of PUT to update a resource. These call types are known as HTTP verbs. The most commonly used verbs for FHIR are:
GET: Used to retrieve known existing resources and requires a resource id or search parameters to identify the resource or resources required. Используется для получения известных существующих ресурсов и требует id ресурса или параметров поиска для идентификации требуемого ресурса или ресурсов.
PUT: Used to update existing resources and always requires a resource id identifying the resource being updated. It can also add a new resource if no resource is found for the id given. In this case, some servers may discard the id and assign their own new id when adding the new resource. Используется для обновления существующих ресурсов и всегда требует id ресурса, идентифицирующего обновляемый ресурс. Он также может добавить новый ресурс, если для данного id не найден ресурс. В этом случае некоторые серверы могут отбросить id и назначить свой собственный новый id при добавлении нового ресурса.
POST: Used to add new resources, there must not be an id in the URL or the resource's content. The server will assign its own id to the resource Используется для добавления новых ресурсов, в URL или содержимом ресурса не должно быть id. Сервер назначит свой собственный id ресурсу
DELETE: Used to remove an existing resource from the server and always requires a resource id to identify the resource being removed. Most servers keep a history of the resource so you can still retrieve the removed resources using the history interaction, we will cover this later. Используется для удаления существующего ресурса с сервера и всегда требует id ресурса для идентификации удаляемого ресурса. Большинство серверов ведут историю ресурса, поэтому вы всё ещё можете получить удалённые ресурсы, используя взаимодействие с историей, мы рассмотрим это позже.
Теперь вы должны знать, как получить ресурс с сервера FHIR и как обновить этот ресурс. Теперь мы собираемся рассмотреть добавление нового ресурса на сервер FHIR. Возможно, у нас есть совершенно новый пациент для ввода в нашу систему. В предыдущем 'Шаге 3: Обновление ресурса на сервере FHIR' мы использовали тип вызова PUT для обновления ресурса. Эти типы вызовов известны как HTTP-глаголы. Наиболее часто используемые глаголы для FHIR:
GET: Used to retrieve known existing resources and requires a resource id or search parameters to identify the resource or resources required. Используется для получения известных существующих ресурсов и требует id ресурса или параметров поиска для идентификации требуемого ресурса или ресурсов.
PUT: Used to update existing resources and always requires a resource id identifying the resource being updated. It can also add a new resource if no resource is found for the id given. In this case, some servers may discard the id and assign their own new id when adding the new resource. Используется для обновления существующих ресурсов и всегда требует id ресурса, идентифицирующего обновляемый ресурс. Он также может добавить новый ресурс, если для данного id не найден ресурс. В этом случае некоторые серверы могут отбросить id и назначить свой собственный новый id при добавлении нового ресурса.
POST: Used to add new resources, there must not be an id in the URL or the resource's content. The server will assign its own id to the resource Используется для добавления новых ресурсов, в URL или содержимом ресурса не должно быть id. Сервер назначит свой собственный id ресурсу
DELETE: Used to remove an existing resource from the server and always requires a resource id to identify the resource being removed. Most servers keep a history of the resource so you can still retrieve the removed resources using the history interaction, we will cover this later. Используется для удаления существующего ресурса с сервера и всегда требует id ресурса для идентификации удаляемого ресурса. Большинство серверов ведут историю ресурса, поэтому вы всё ещё можете получить удалённые ресурсы, используя взаимодействие с историей, мы рассмотрим это позже.
Let's take our same Patient resource as used in Steps 2 & 3, as our template for the new patient, change it a little, and submit it to the FHIR server as a brand new resource. The first thing to do is change the verb in Postman to be POST and then copy in your new Patient resource into the body section at the top of Postman.
Now we need to edit both the resource and the URL to perform an add. For the URL we need only the 'Service Root' and the resource type, which for this example is Patient as seen below:
[Service Root URL]/Patient
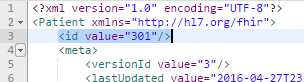
That is the URL done, now for the resource itself. Near the very top of the resource, you will see an id element with an attribute of value which is equal to the id of the resource we copied. This is the resource id and as we are creating a brand new resource we need to remove this whole element. If we don't the server could return a 400 Bad Request error. Feel free to hit Send before you remove it to see this error in action: don't worry, the server won't catch on fire.
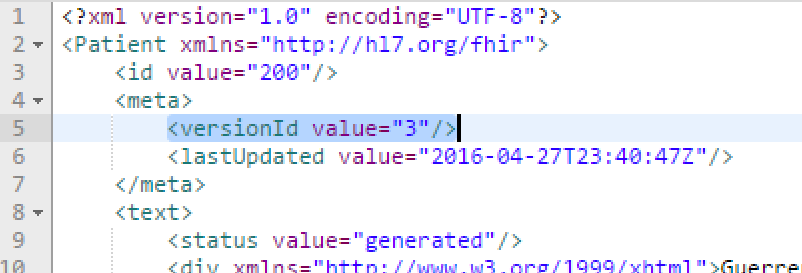
So after hitting Send with the id element removed you should be returned the entire resource and a status of 201 Created. If you inspect the returned resource's id element you will find that the server has assigned a new id value, this is now the FHIR servers assigned id for your resource. It's also worth noting the versionId in the meta element, this should be set to '1' as this is the very first version of this resource.
Now you know how to add new resources, the same process works for all resources: you just need change the resource type on the end of the URL.
Давайте возьмём тот же ресурс Patient, который использовался в Шагах 2 и 3, в качестве шаблона для нового пациента, немного изменим его и отправим на сервер FHIR как совершенно новый ресурс. Первое, что нужно сделать, - это изменить глагол в Postman на POST, а затем скопировать ваш новый ресурс Patient в секцию body вверху Postman.
Теперь нам нужно отредактировать как ресурс, так и URL для выполнения добавления. Для URL нам нужны только 'Service Root' и тип ресурса, который для этого примера - Patient, как показано ниже:
[Service Root URL]/Patient
Это URL готов, теперь для самого ресурса. В самом верху ресурса вы увидите элемент id с атрибутом value, который равен id ресурса, который мы скопировали. Это id ресурса, и поскольку мы создаём совершенно новый ресурс, нам нужно удалить весь этот элемент. Если мы этого не сделаем, сервер может вернуть ошибку 400 Bad Request. Не стесняйтесь нажать Send перед тем, как удалить его, чтобы увидеть эту ошибку в действии: не волнуйтесь, сервер не загорится.
Итак, после нажатия Send с удалённым элементом id вы должны получить весь ресурс и статус 201 Created. Если вы проверите элемент id возвращённого ресурса, вы обнаружите, что сервер назначил новое значение id - это теперь назначенный сервером FHIR id для вашего ресурса. Также стоит отметить versionId в элементе meta - он должен быть установлен в '1', поскольку это самая первая версия этого ресурса.
Теперь вы знаете, как добавлять новые ресурсы, тот же процесс работает для всех ресурсов: вам просто нужно изменить тип ресурса в конце URL.
Step 5: Deleting a resource from the FHIR server Шаг 5: Удаление ресурса с сервера FHIR
This one's easy, set the Http verb to DELETE and use the 'Service Root' appended with the resource type you wish to remove e.g. 'Patient' and append to that the resource id of the resource you want to remove. So if you had a Patient resource with an id of '123456' then this URL would remove that resource is:
[Service Root URL]/Patient/123456
But before you delete a resource let's think about what happens on the server. Most, but not all FHIR servers support resource history. This means that every update you make to a resource is kept on the server and each update increments a version number. This version number is known as the versionId. When you delete a resource the server treats this action as just another update, yet this update marks the resource as deleted and you will no longer find the resource when doing a normal GET call. But you can retrieve the deleted resource by its versionId. So to explain this a bit better, consider the operations in order below:
- Patient resource, added via a POST {this is versionId = 1}
- Patient resource, updated via a PUT {this is versionId = 2}
- Patient resource, deleted via a DELETE {this is versionId = 3}
- Patient resource, attempted to retrieve by resource id via a GET {no resource will be found}
- Patient resource, attempted to retrieve by resource id and _history/2 via a GET {resource will be found as updated in step 2}
- Patient resource, as retrieve in step 5, added via a PUT {this is versionId = 4}
The key point here is that deleting a resource is also considered a version update.
So let's now go ahead and delete our original Patient resource. Using the URL below, setting the Http verb to DELETE and hitting Send.
[Service Root URL]/Patient/[id]
You should receive back a 204 No Content return code which indicates the resource was successfully removed.
Following this you can then retrieve the same resource back again using the _history/[version number you require]. Let's try and retrieve versionId=1 using the URL as below, and the Http verb of GET.
[Service Root URL]/Patient/[id]/_history/1
Now you can delete resources and retrieve historical versions of resources, well done!
Это легко: установите HTTP-глагол на DELETE и используйте 'Service Root', добавив к нему тип ресурса, который вы хотите удалить, например 'Patient', и добавьте к этому id ресурса, который вы хотите удалить. Итак, если у вас есть ресурс Patient с id '123456', то этот URL удалит этот ресурс:
[Service Root URL]/Patient/123456
Но прежде чем удалить ресурс, давайте подумаем о том, что происходит на сервере. Большинство, но не все серверы FHIR поддерживают историю ресурсов. Это означает, что каждое обновление, которое вы делаете с ресурсом, сохраняется на сервере, и каждое обновление увеличивает номер версии. Этот номер версии известен как versionId. Когда вы удаляете ресурс, сервер рассматривает это действие как просто ещё одно обновление, но это обновление помечает ресурс как удалённый, и вы больше не найдёте ресурс при выполнении обычного вызова GET. Но вы можете получить удалённый ресурс по его versionId. Чтобы объяснить это немного лучше, рассмотрите операции в порядке ниже:
- Ресурс Patient, добавленный через POST {это versionId = 1}
- Ресурс Patient, обновлённый через PUT {это versionId = 2}
- Ресурс Patient, удалённый через DELETE {это versionId = 3}
- Ресурс Patient, попытка получить по id ресурса через GET {ресурс не будет найден}
- Ресурс Patient, попытка получить по id ресурса и _history/2 через GET {ресурс будет найден как обновлённый в шаге 2}
- Ресурс Patient, как получен в шаге 5, добавлен через PUT {это versionId = 4}
Ключевой момент здесь в том, что удаление ресурса также считается обновлением версии.
Итак, давайте теперь удалим наш оригинальный ресурс Patient. Используя URL ниже, установив HTTP-глагол на DELETE и нажав Send.
[Service Root URL]/Patient/[id]
Вы должны получить обратно код возврата 204 No Content, который указывает, что ресурс был успешно удалён.
После этого вы можете снова получить тот же ресурс, используя _history/[номер версии, который вам нужен]. Давайте попробуем получить versionId=1, используя URL, как показано ниже, и HTTP-глагол GET.
[Service Root URL]/Patient/[id]/_history/1
Теперь вы можете удалять ресурсы и получать исторические версии ресурсов, отлично!